Time Management — Documentation
A complete admin guide to Exalise Time Management: adding employees, the employee app for remote and telework check-in, work schedules, overrides, company holidays, the employee overview, and PDF exports.
Which setup do you have?
Pick yours and this page shows only the parts that apply to you. Nothing is lost — switch back to see everything.
How you track time
How people clock in
Pick every method you use.
On this page
Overview
Exalise Time Management is a working-time registration system built for Belgian SMEs. Employees clock in and out in one of three ways — by tapping a physical RFID badge on a reader, by tapping their name and entering a 4-digit PIN on a shared tablet running the Kiosk webapp, or from their own phone using the employee app, which is what makes telework and off-site work possible. Every clock event is logged automatically, matched against the employee's work schedule, and rolled up into a monthly overview that can be exported as a PDF.
This documentation is written for the person managing the system for your company — typically an office manager, HR contact, or business owner. It walks through every part of the admin interface: adding employees, setting up schedules, handling holidays and absences, and getting hours out as a report.
Time management in the left-hand navigation, with a few company-wide settings under Account.Getting started (first-time setup)
From an empty account to your first employee clocking in — six steps. Each one links to the full details further down this page.
- 1
Add your first employee
A first and last name is all it takes. Badges, PINs and schedules come afterwards.
- 2
Choose how they clock in
Three independent methods — pick one to start with. You can add the others later, and an employee can use more than one.
RFID badge Employees tap a physical badge on a network reader at the door. Needs a reader — we help you set it up. Connect a reader Kiosk tablet Employees tap their name and type a 4-digit PIN on a shared tablet. No hardware — you can start today. Set up the kiosk Employee app Employees check in from their own phone, wherever they are — the option for telework and off-site work. No hardware. Set up the app - 3
Set their work schedule
Enter a start and end time per weekday, so Exalise knows when someone is expected to work. This is what planned hours are measured against.
- 4
Set up breaks and company holidays
Configure these once under Account and they apply to every employee automatically — including anyone you add later.
- 5
Do a test run
Have someone clock in, then open the employee overview: their tile turns green with an IN badge and a running timer.
- 6
Export your first report
At the end of the month, open a month overview and click Export PDF — a per-employee timesheet with worked, planned and break totals.
That's the full loop.
Everything else in this guide — overrides, manual corrections, roles and access — is there for when you need it, not required to get started.
Roles & access
Access is controlled per company account (called a license), not per individual user role. Anyone who logs in under your company account sees the same navigation and can do the same things — there is no separate "read-only" or "manager" level.
- Company users — the people who log in to manage the system (you, colleagues, HR). They can add employees, edit schedules, handle overrides and holidays, and export reports.
- Employees — the people being tracked. An employee is a lightweight record (name, optional PIN, optional RFID badge, optional e-mail address) — not a company login account. Employees never reach the admin interface: they interact with the system only through an RFID reader, the Kiosk tablet, or the employee app on their own phone. Even in the app, an employee can only clock in and out and view their own hours — never a colleague's data and never any setting.
If Time management or Kiosk doesn't appear in your navigation, that feature hasn't been enabled on your license yet — get in touch and we'll switch it on.
Adding & managing employees
Open Time management from the main navigation. This page shows a grid with one tile per employee, plus an Add Employee tile at the end.
Add a new employee
- Click the
Add Employeetile. - Enter the employee's first name and last name — these are the only two fields required to create an employee.
- Save. A new tile appears on the grid immediately.
That's enough to get someone into the system — you can add their RFID badge, kiosk PIN, and work schedule afterwards (see the next sections).
Edit, archive, or delete an employee
Click an employee's tile to open their detail drawer. From there:
Edit Employee— change the first or last name.Archive Employee— deactivates the employee. They disappear from the Kiosk tap screen and stop being counted, but their full history (sessions, schedules, overrides) is kept. Use this for someone who's left the company.Delete Employee— permanently removes the employee and their history. This asks for confirmation first and cannot be undone, so archiving is usually the safer choice.
Sofie Peeters
09:00 - 17:00
Tom Van Damme
09:00 - 17:00
Amina El Idrissi
09:00 - 17:00
Add Employee
Add Employee
Illustrative preview, recreated from the real interface — not a live screenshot.
Connecting a physical RFID reader
Exalise doesn't manufacture or sell RFID hardware itself — the platform is hardware-agnostic and pairs with compatible network RFID readers over a secure connection. Employees still just tap a badge; everything else works exactly like the RFID flow described elsewhere in this guide.
Recommended reader
Exalise integrates with the Inveo RFID-IND-U4 — a compact, PoE-powered network reader (a single cable carries both power and network) that supports common badge standards and can securely push scan events straight to Exalise. If you don't have RFID hardware yet, this is the reader we recommend and help you set up.
How the connection works
- Mount and power the reader. The Inveo IND-U4 is powered over Ethernet (PoE), so it only needs a single network cable to a PoE switch or injector near the entrance, workstation, or time clock location.
- We issue dedicated credentials for your reader. Exalise generates a unique API key for that specific device and configures the reader to notify Exalise securely (HTTPS) every time a badge is tapped — no separate software or app is needed on the reader itself.
- Link badges to employees. Once the reader is connected, tapping an unrecognized badge makes it appear as the most recent scan on the
Time managementpage — from there, useRead RFID Cardexactly as described below to assign it to an employee.
Employee taps their badge
Inveo IND-U4 reader (PoE)
Secure HTTPS push, with reader credentials
Employee clocked in/out in Exalise
Conceptual overview of the connection — not a live screenshot.
Linking an RFID badge
Once a reader is physically connected (see above), linking a badge to an employee takes a few seconds — this is a separate system from the Kiosk PIN described next.
- On the
Time managementpage, click the floatingRead RFID Cardbutton (bottom-right). - Tap the physical badge on your connected RFID reader — its Card UID and scan details appear on screen.
- Select the employee to assign it to from the list.
- Click
Write to Cardto link the badge to that employee.
The same panel has a debug list of all registered cards, with the option to delete a card if a badge is lost or reassigned.
Read RFID Card
Hold an RFID card against the reader to read/write the card
Card UID
04:A3:9F:2C
Assign to employee
Illustrative preview, recreated from the real interface — not a live screenshot.
Kiosk mode
Kiosk mode turns a shared tablet (e.g. an iPad at the entrance) into a self-service clock-in/out terminal — no RFID reader hardware required. It's a separate feature from your license and must be enabled before Manage kiosk devices appears on the Time management page.
Setting up a kiosk device
- Click the floating
Manage kiosk devicesbutton on theTime managementpage. - Give the device a name (e.g. "iPad reception") and click
Add kiosk device. - Step 1 — Install: on the tablet, scan the install QR code (or open the link directly) and add the page to the home screen. The kiosk must run as an installed, full-screen app — it won't accept credentials from a plain browser tab.
- Step 2 — Connect: click
Nextto reveal a second QR code containing one-time setup credentials. On the tablet, open the installed app and scan this code (or paste the setup link) to pair it.
Manage kiosk devices and use Revoke — or Regenerate to rotate its credentials and force it to be re-paired.Daily use on the tablet
- The tablet shows a grid of employee tiles — "Tap your name." Each tile shows a live IN/OUT dot and, if checked in, "In since {time}".
- Tapping a name opens the PIN screen: "You'll be checked in" or "You'll be checked out" (the app already knows which, based on current status), then "Enter your PIN." The 4-digit keypad submits automatically on the fourth digit.
- A result screen confirms "Checked in", "Checked out", or "Scan undone," then returns to the grid automatically after about two seconds.
Kiosk devices
iPad reception
● Connected
Step 2 — Connect
Scan this code with the kiosk app.
Copy linkIllustrative preview, recreated from the real interface — not a live screenshot.
Tap your name
Sofie P.
Tom V.
Amina E.
Karim B.
You'll be checked in
Enter your PIN
Sofie Peeters
Checked in
Tapped by mistake? Tap again within 30s to undo.
Illustrative preview, recreated from the real interface — not a live screenshot.
Setting a Kiosk PIN
The Kiosk PIN is a separate system from RFID badges — it's the 4-digit code an employee types on the Kiosk tablet after tapping their name (see Kiosk mode above). An employee can have a badge, a PIN, both, or neither.
Open the employee's detail drawer and find the Kiosk PIN card. It shows PIN set or PIN not set.
Set PIN/Update PIN— choose a 4-digit code the employee will type on the Kiosk tablet.Remove PIN— disables kiosk clock-in for that employee until a new PIN is set.
Kiosk PIN
Lets this employee clock in/out on the kiosk tablet.
PIN setIllustrative preview, recreated from the real interface — not a live screenshot.
The employee app (remote check-in)
The employee app is a third way to clock in, alongside RFID badges and the shared Kiosk tablet. Instead of walking up to a terminal, each employee adds a small web app to their own phone and checks in and out from wherever they are — at the office, at home on a telework day, or on the road.
Every clock event is timestamped on our servers, not on the phone, and lands in exactly the same record as a badge tap or a kiosk entry. Your dashboard, monthly overview, alerts and PDF export don't change in any way — a remote check-in is simply another clock event.
What an employee needs
- A work e-mail address, entered by you on their employee record.
- A smartphone (iPhone or Android) with a browser.
- A 4-digit PIN — the same PIN as the Kiosk tablet. Someone who already clocks in at a kiosk keeps the code they know; someone new picks one the first time they open the app.
Inviting an employee
- Open
Time managementand click the employee's tile to open their detail drawer. - Find the
Remote check-in appcard. - Enter their work e-mail address and click
Send invite.
They receive an e-mail containing an 8-character setup code (shown as XXXX-XXXX) and a button that opens the app. The code works once and expires after 24 hours. If it expires or gets lost, use Send new link on the same card — or the employee can request a fresh one themselves from the app's sign-in screen, without needing you at all.
What the employee does
- Adds the app to their home screen — see Adding the app to a phone's home screen below for the exact steps per device.
- Opens the newly added Exalise Time icon.
- Types in the setup code from the e-mail.
- Chooses a 4-digit PIN, or confirms the one they already use at the kiosk.
After that the app opens straight onto a single screen: their name, whether they're currently checked in, and one large button to check in or out. Each tap asks for the PIN — that's what ties a record to the person rather than just to the phone.
Day-to-day use
- Checking in or out — open the app, tap the button, enter the PIN. A few seconds.
- Correcting a slip — tapping again within 30 seconds undoes the last action, exactly like the Kiosk.
- Seeing their own hours —
My hourslists their recent sessions with dates, times and durations. An employee only ever sees their own record, never a colleague's.
Setup is a one-time job. The app then stays signed in on that phone for 90 days of use.
Removing access
On the same Remote check-in app card, Revoke access immediately signs the employee out on every device they have set up and clears their e-mail address from the system. Use it when someone leaves, or when a phone is lost, sold or replaced.
Adding the app to a phone's home screen
Because the employee app is a web app, it isn't installed from an app store — it's added to the phone's home screen from the browser, after which it opens full screen with its own icon, like any other app. The steps differ between iPhone and Android, so this section is written to be forwarded straight to employees.
iPhone and iPad (Safari)
The Share menu used below exists only in Safari. If the link opened in Chrome, Firefox, or inside another app such as Outlook or Gmail, tap that app's menu first and choose Open in Safari.
- Open the invitation e-mail on the iPhone and tap Open Exalise Time. The page opens in Safari and shows the setup code — keep the e-mail handy, the code is needed in a moment.
- Tap the Share icon in the Safari toolbar: the square with an arrow pointing up. It sits next to the address bar — at the top on an iPad, and at the top or the bottom on an iPhone depending on where that phone keeps its address bar.
- Scroll down the list of options and tap Add to Home Screen.
- Tap Add at the top right. The Exalise Time icon appears on the home screen.
- Leave Safari and open the new Exalise Time icon from the home screen.
- Type in the 8-character setup code from the e-mail, then choose a 4-digit PIN.
Android (Chrome)
- Open the invitation e-mail on the phone and tap Open Exalise Time. The page opens in Chrome and shows the setup code.
- Chrome usually offers an Install banner just below the address bar — if it appears, tap it and jump to the confirmation step.
- If no banner appears, tap the menu icon (⋮) at the top right of Chrome.
- Tap Install and create shortcut — older versions read Add to Home screen or Install app.
- If asked to choose, pick Install and not Create quick link. A quick link is only a bookmark that opens in Chrome: it looks like an icon on the home screen but does not have the app's own storage, so the setup code will never stick.
- Confirm with Install. The Exalise Time icon appears on the home screen or in the app drawer.
- Open the new Exalise Time icon, type in the 8-character setup code from the e-mail, then choose a 4-digit PIN.
If something doesn't work
- "That code is not valid or has already been used" — the code has expired (they last 24 hours) or was already used to set up another device. Tap
I don't have a codeon the sign-in screen to get a new one by e-mail, or ask an administrator to send a fresh invite. - The app keeps asking for a code even though setup was done — this almost always means the browser is open rather than the icon added to the home screen. Close it and open the Exalise Time icon instead.
- The employee has a new phone — just repeat the steps on the new device.
I don't have a codeon the sign-in screen sends a fresh code to their work e-mail; no administrator action needed. - "No PIN set for this employee" — the employee record has no PIN yet. An administrator can set one from the
Kiosk PINcard, or the employee can choose one the first time the app asks.
These screenshots were taken on a phone set to Dutch. On a phone in another language the wording differs, but every menu item sits in exactly the same place — each caption gives the Dutch label as it appears in the picture, with the English wording beside it.
iPhone and iPad (Safari), step by step
- 1
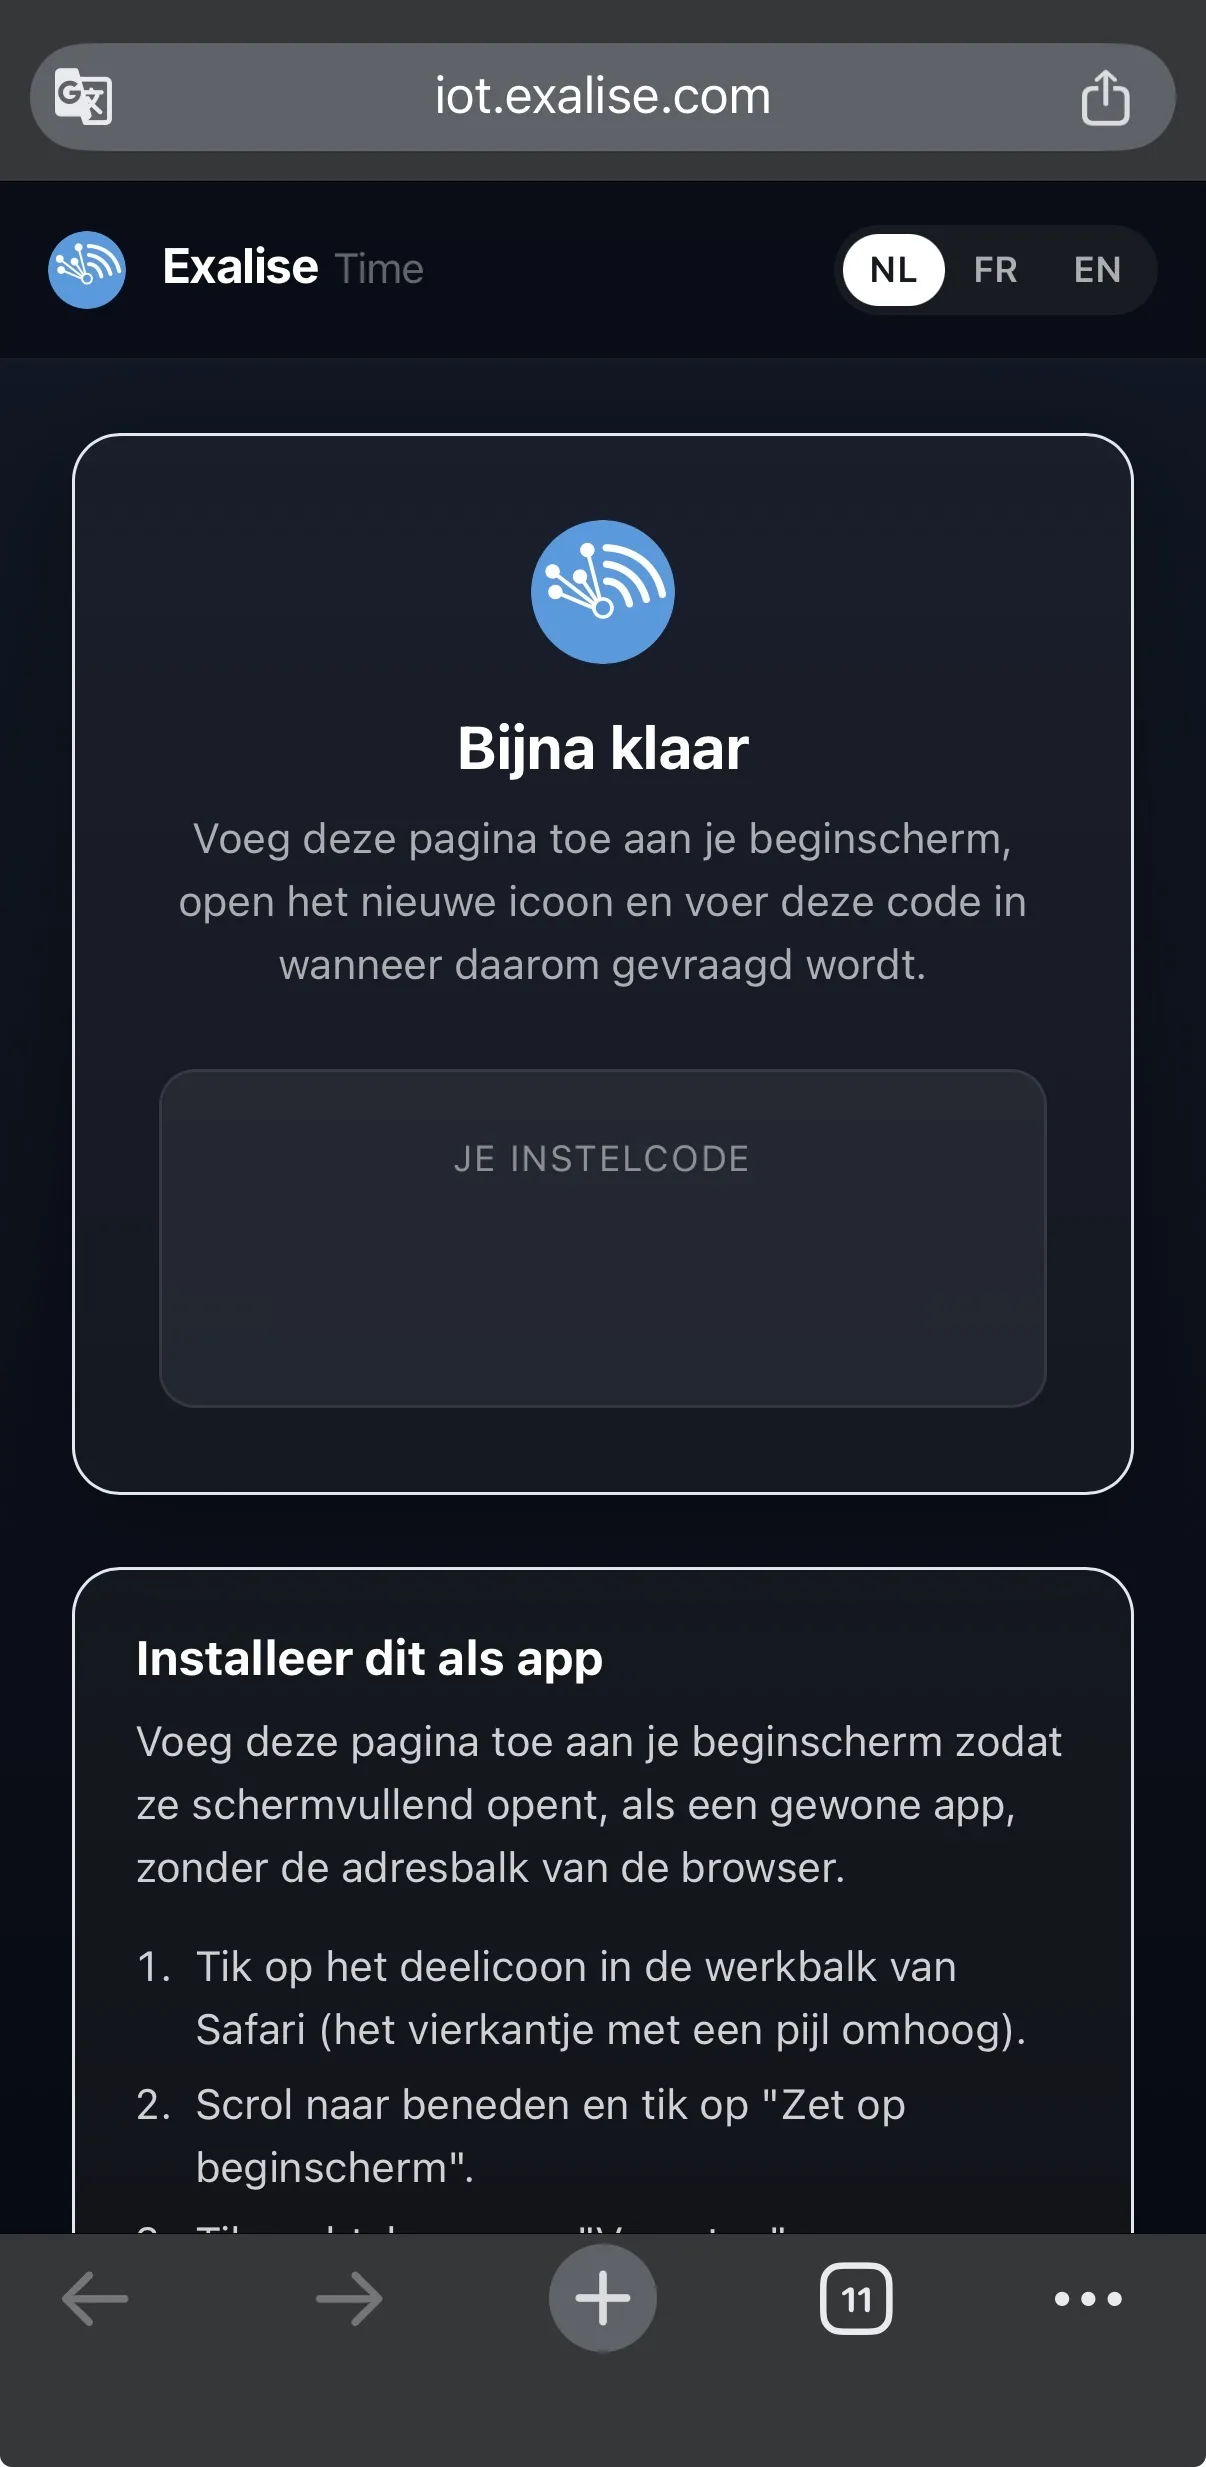
Tapping the button in the e-mail opens the page in Safari and shows the setup code. Leave the e-mail where you can find it — the code has to be typed into the installed app in a moment, not here.
- 2
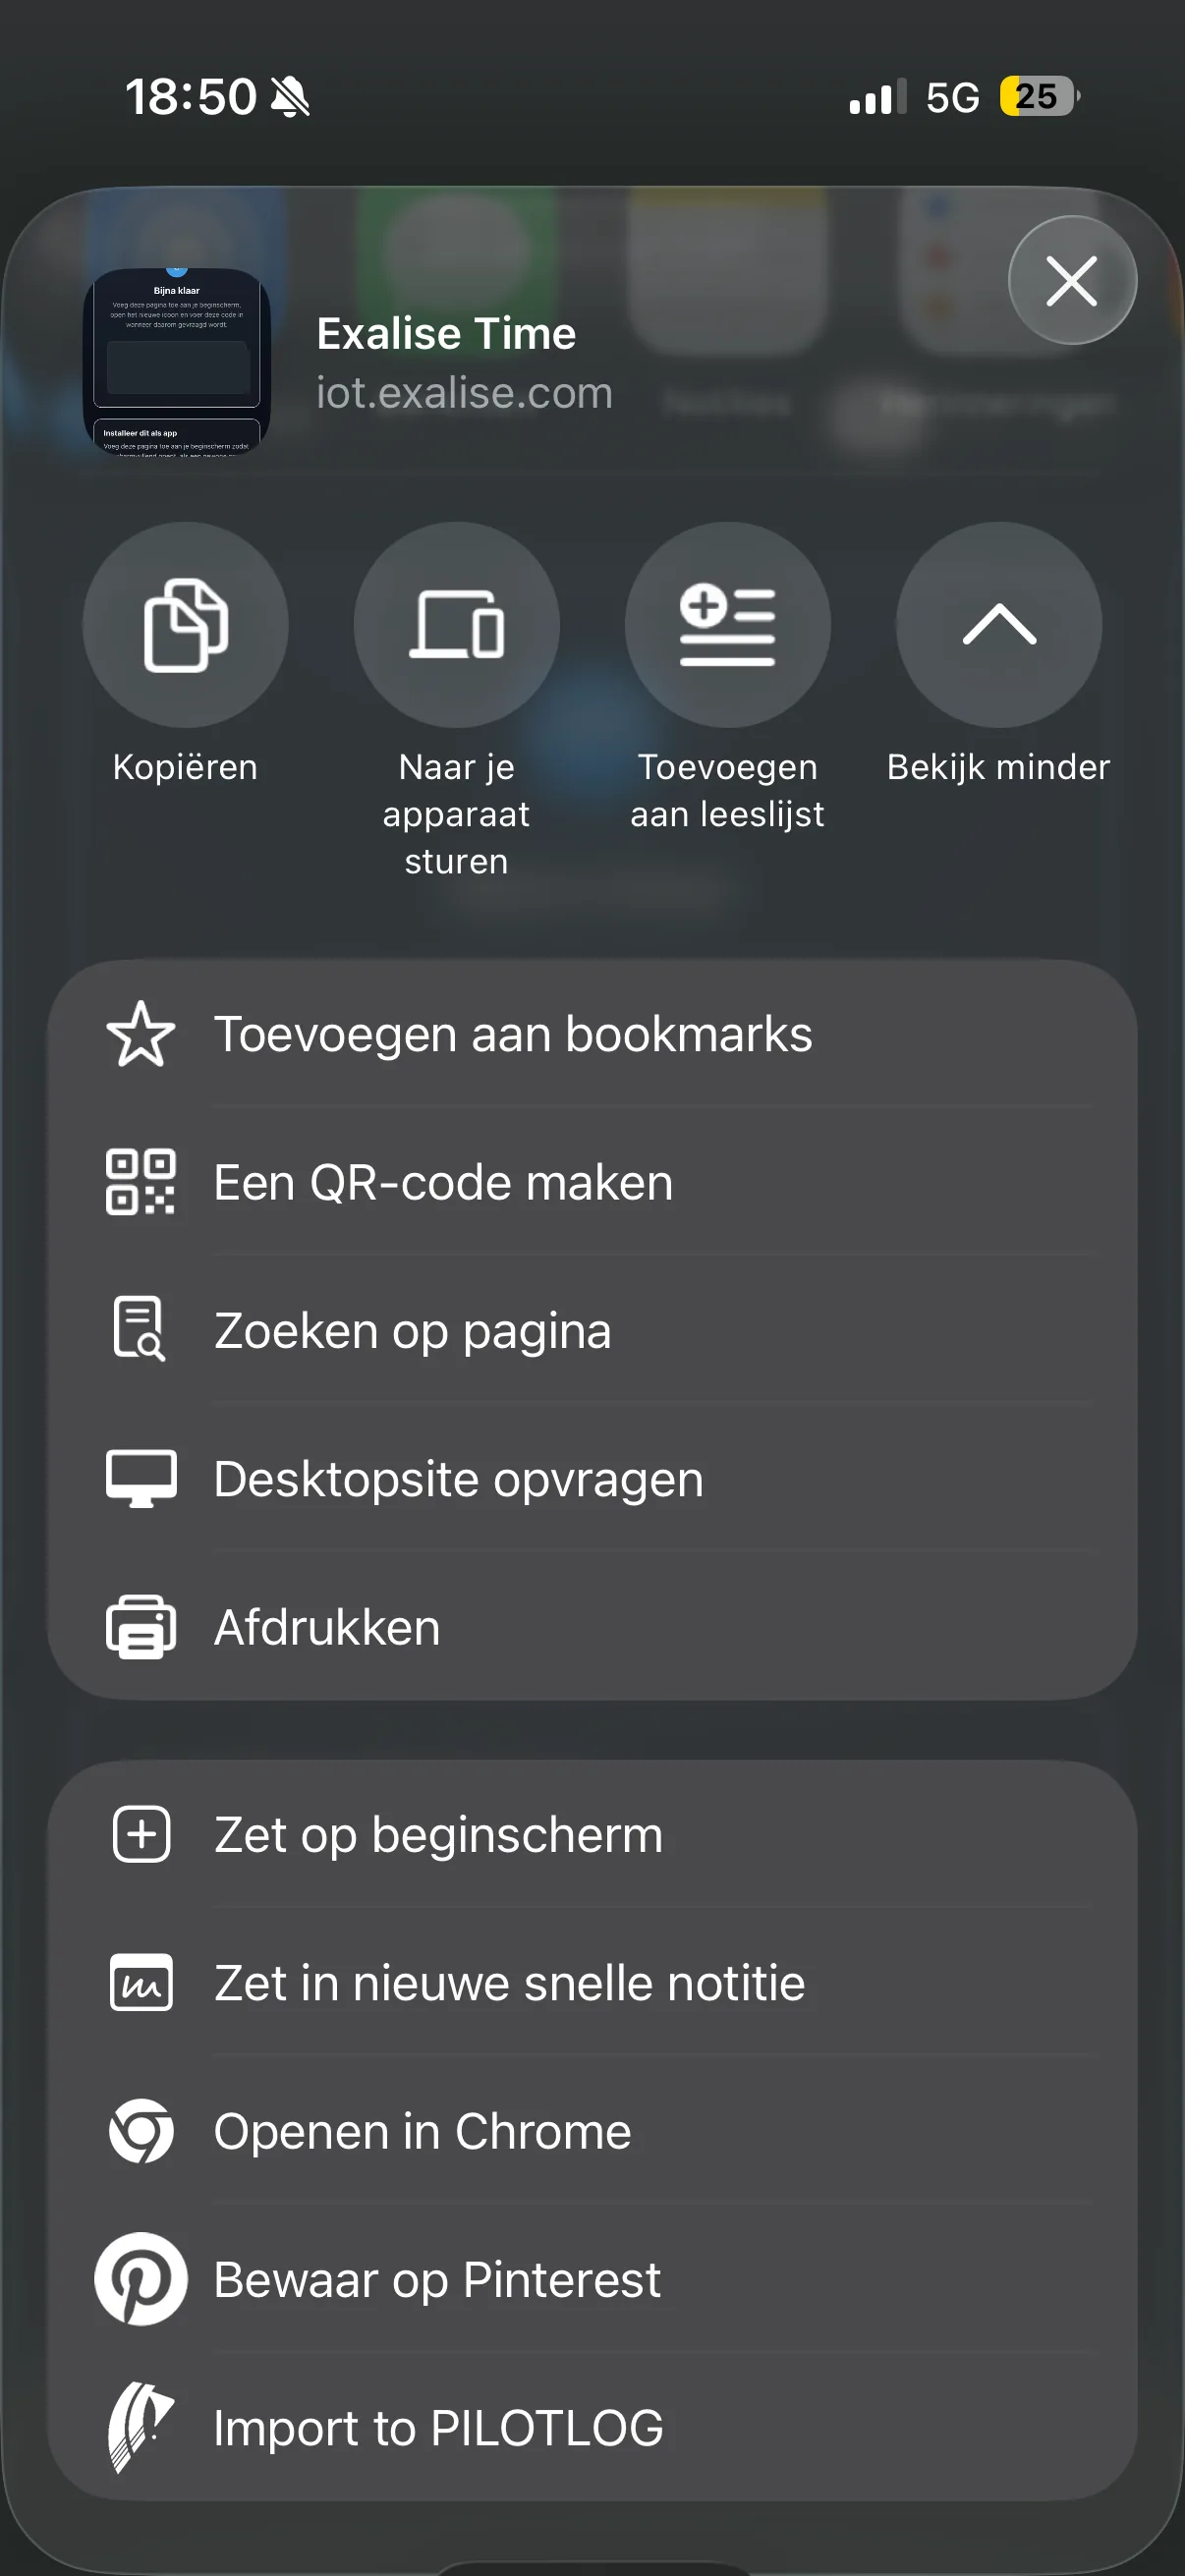
Tap the Share icon in the Safari toolbar, then scroll down this list and tap "Zet op beginscherm" (Add to Home Screen). It sits well below the row of round icons at the top.
- 3
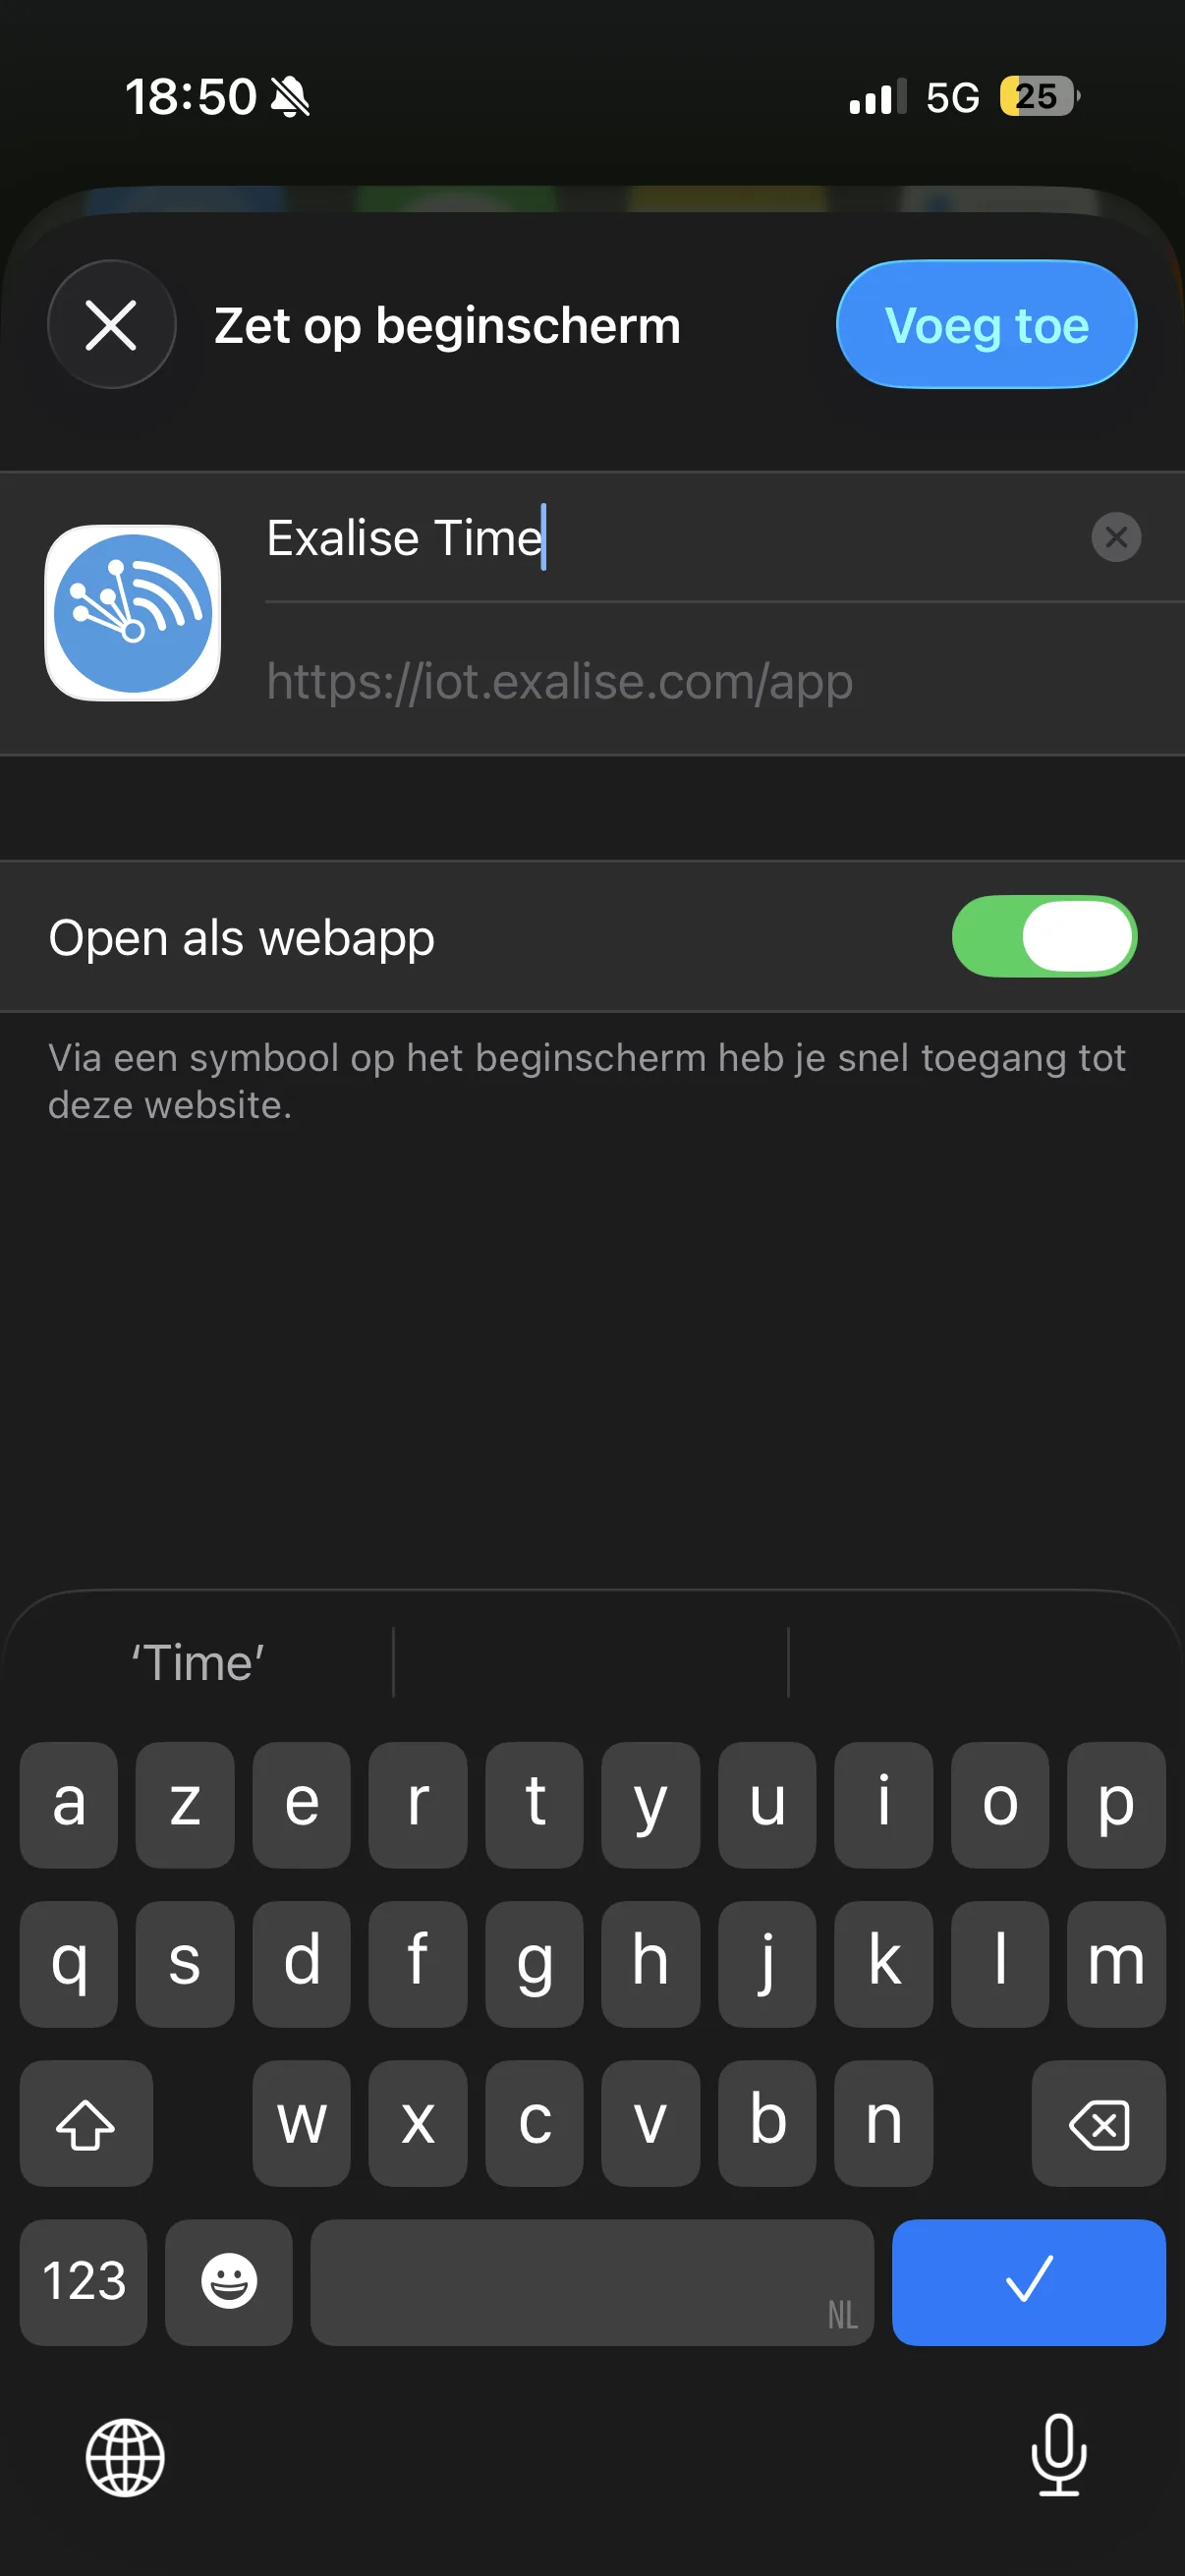
The name can be left as it is. Tap "Voeg toe" (Add) at the top right, and the Exalise Time icon appears on the home screen.
Android (Chrome), step by step
- 1
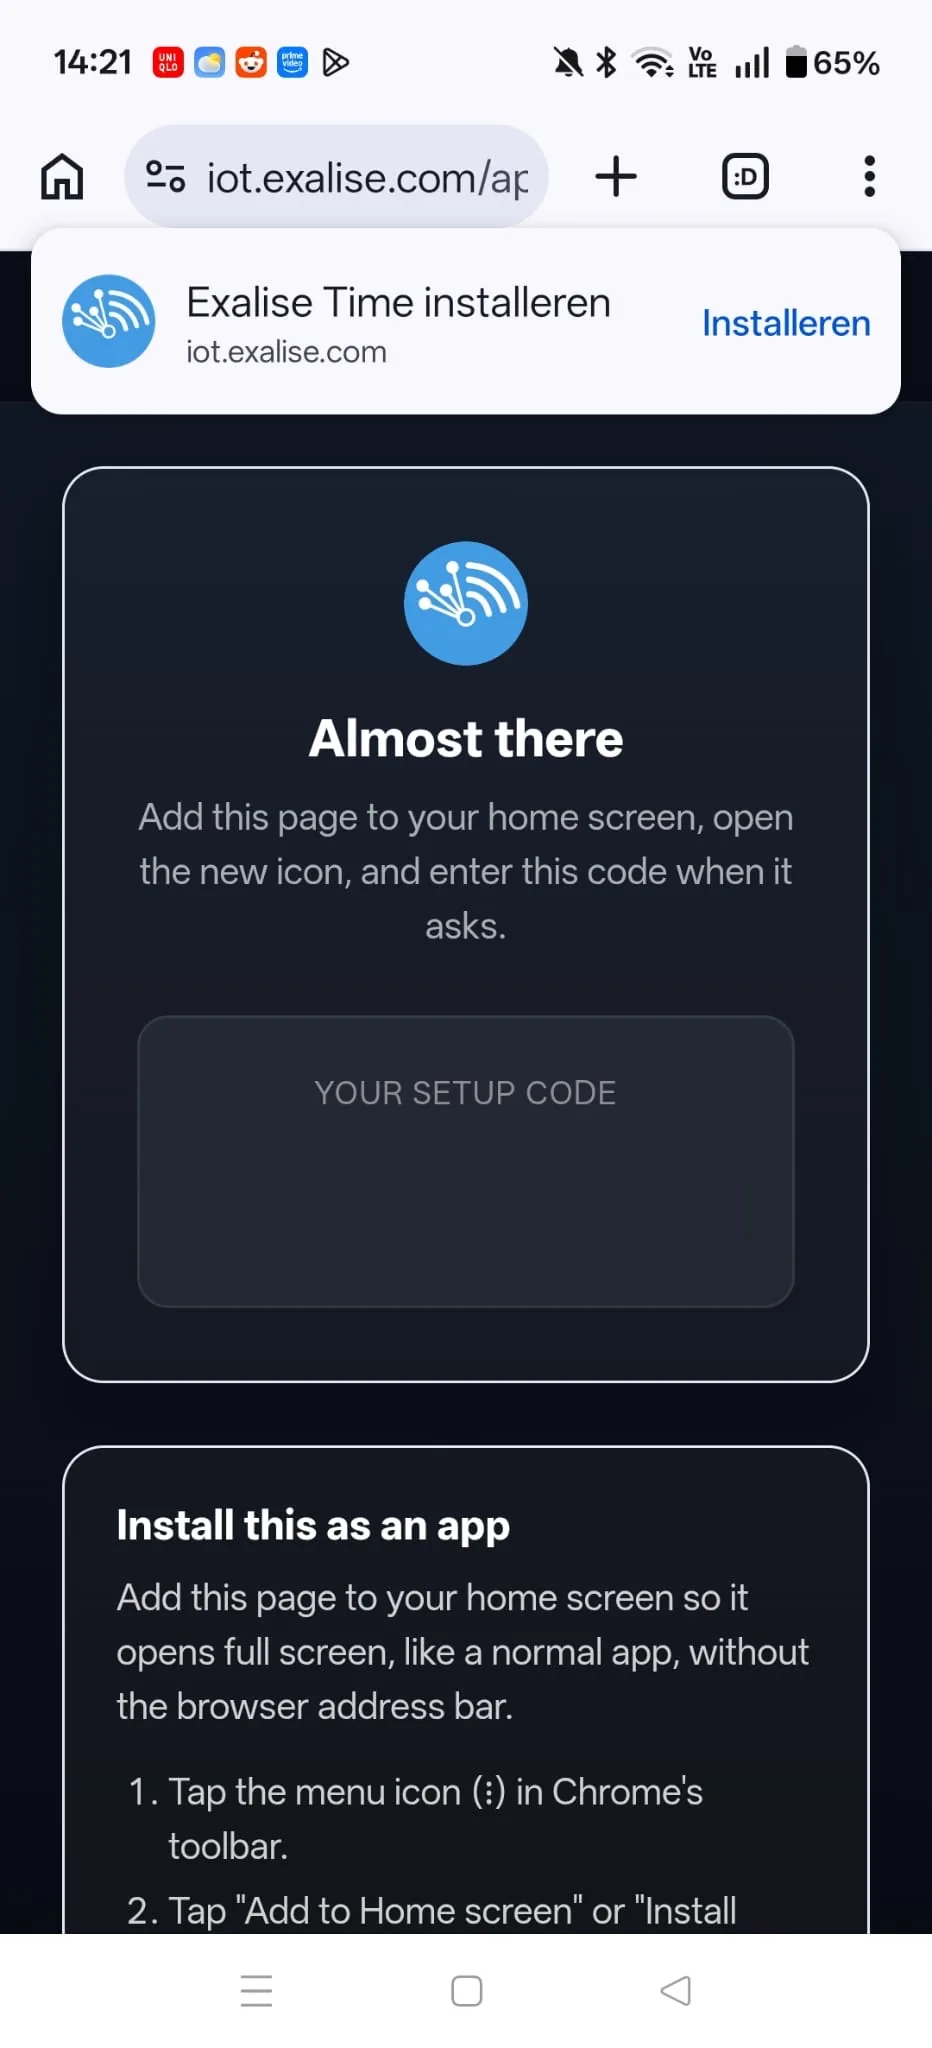
The page opens in Chrome, which usually offers a banner at the top: "Installeren" (Install). If you see it, tap it and skip to the last step.
- 2
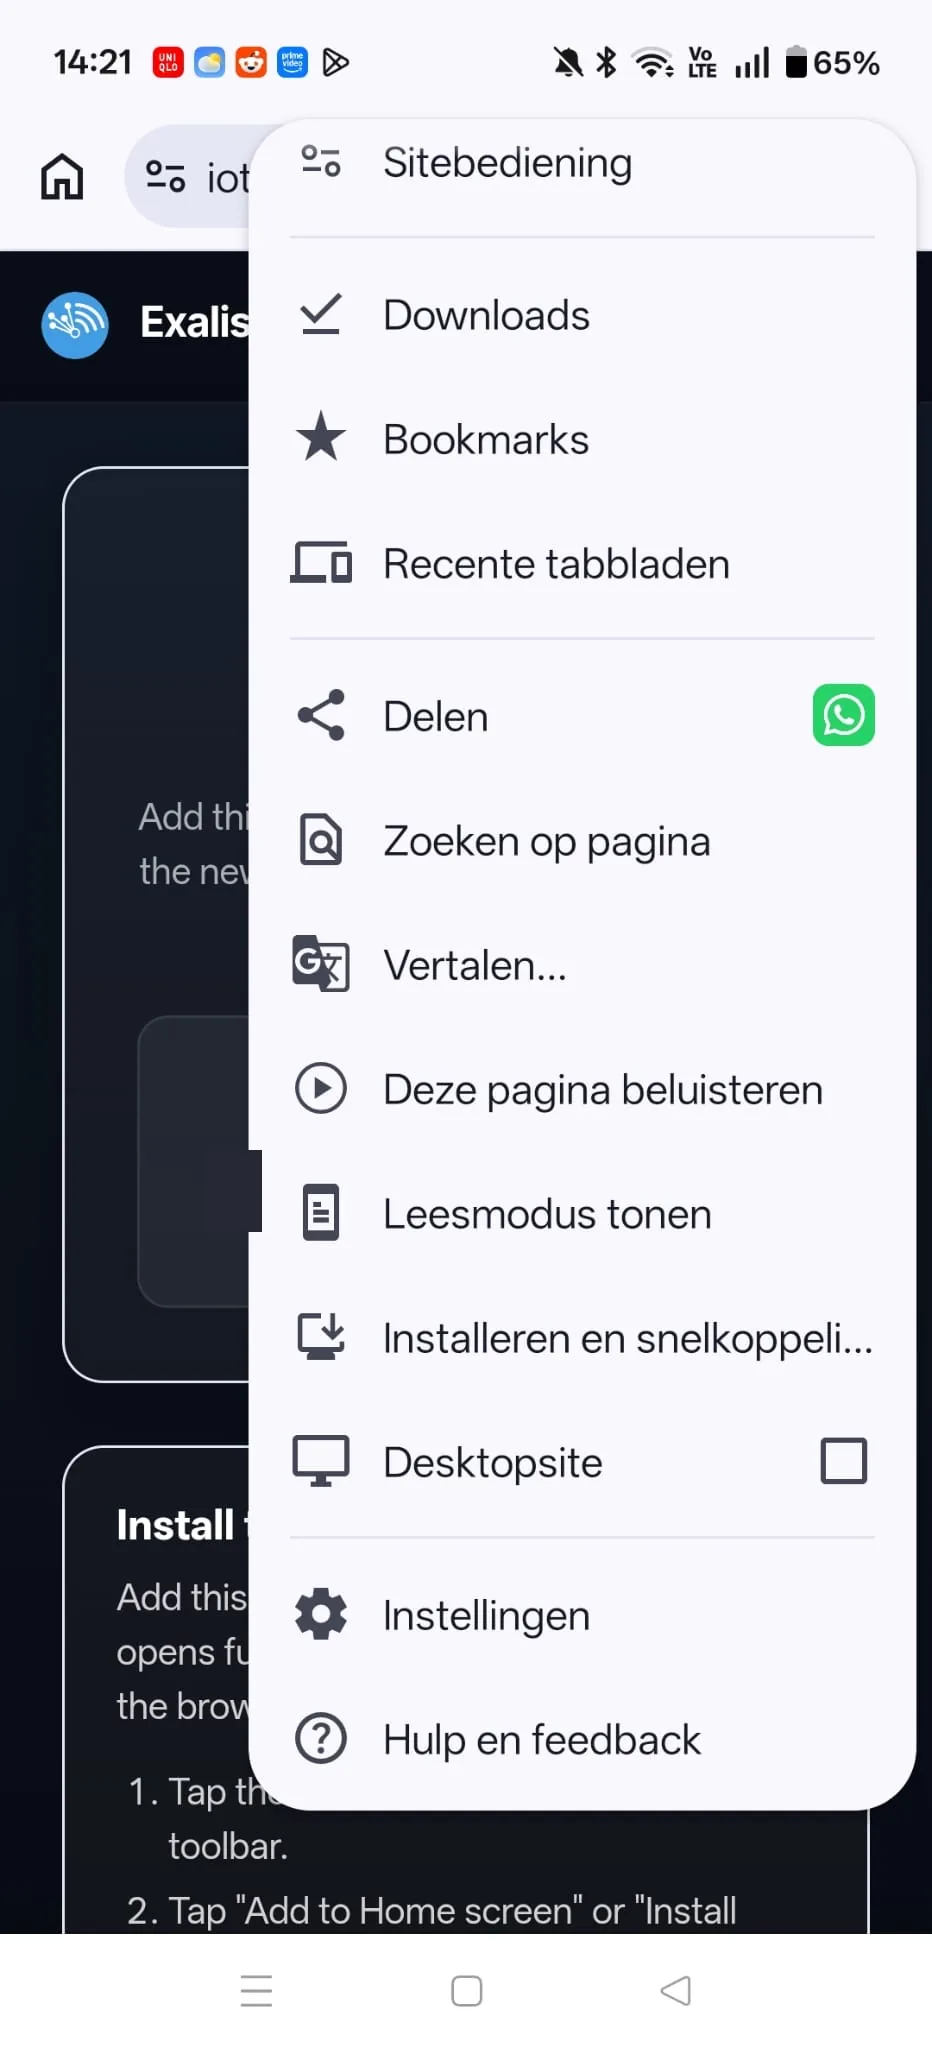
No banner? Tap the ⋮ menu at the top right and choose "Installeren en snelkoppeling maken" (Install and create shortcut).
- 3
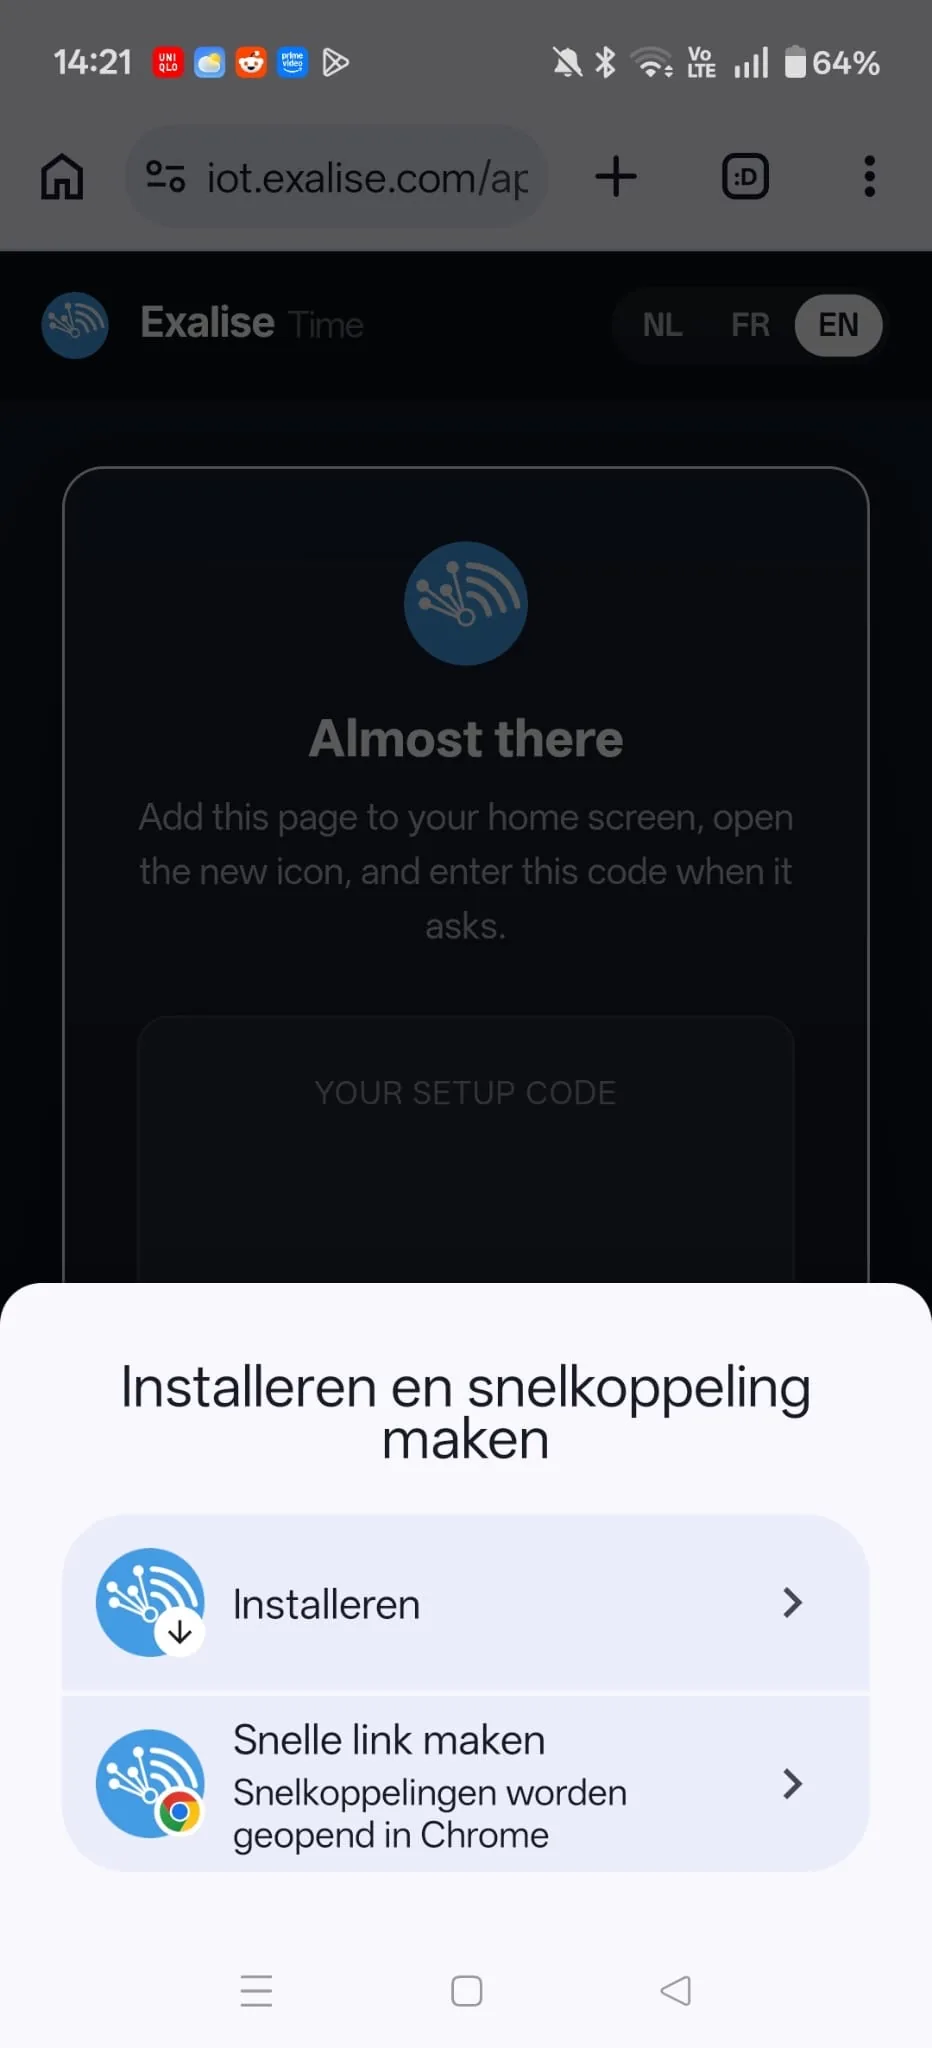
Choose "Installeren" (Install) — the top option. Not "Snelle link maken" (Create quick link): that one only makes a bookmark that opens in Chrome, which is not a real installation and will not work.
- 4
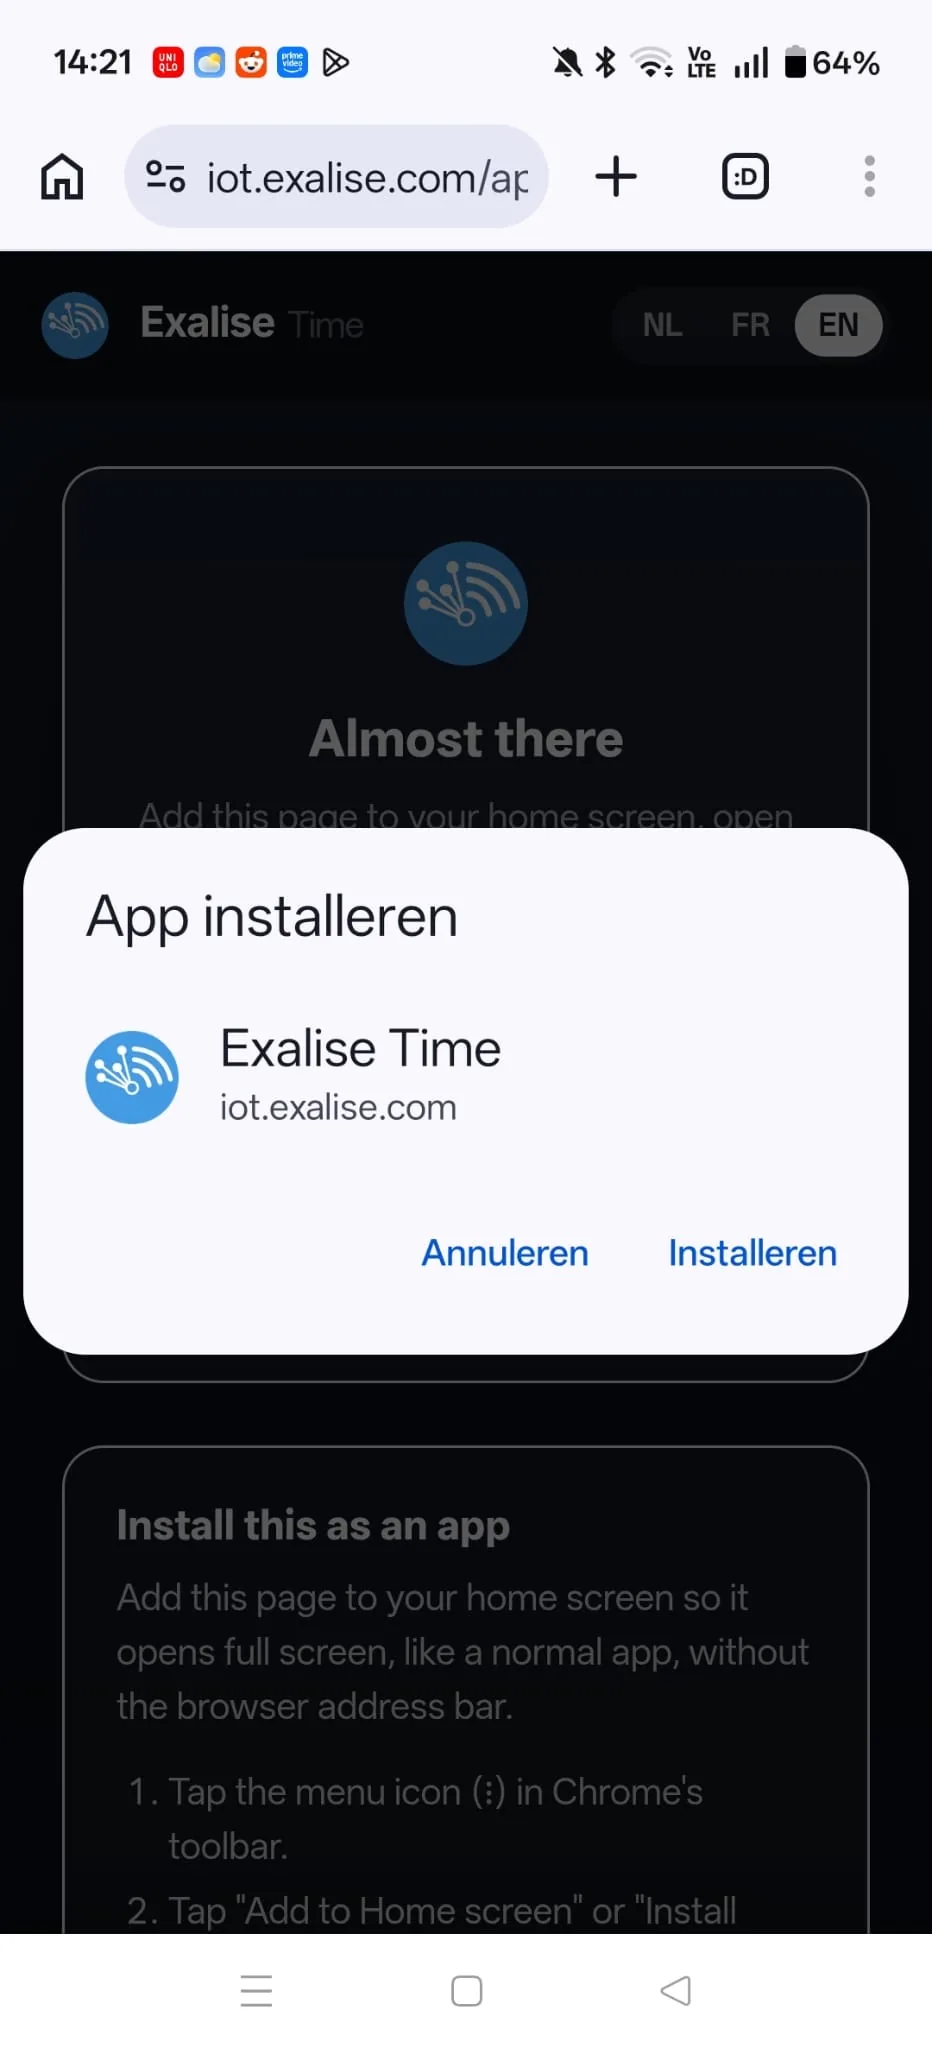
Confirm with "Installeren" (Install). The Exalise Time icon appears on the home screen or in the app drawer.
Setting up a basic work schedule
A work schedule defines when an employee is expected to work, day by day. Schedules are set per employee — there's no shared "company default" schedule, though you can copy the same times to each new hire.
Create a schedule
- Open the employee's detail drawer and find the
Work schedulecard. - Click
Create schedule(orAdd new scheduleif one already exists). - For each weekday (Monday–Sunday), enter a start time and end time. Leave both blank for a day the employee doesn't work.
- Set Effective from — the date this schedule starts applying.
- Save.
Schedule history and future changes
Schedules shown in the card are listed in an accordion labelled "Valid from {date} - Valid until {date}". You can have several schedules for one employee — the system always uses whichever one has the latest effective-from date that isn't in the future for the day being checked. This means you can create a new schedule ahead of time (e.g. a switch to part-time starting next month) without disturbing the current one.
Edit schedule times— change the day-by-day times of an existing schedule.Delete schedule— only available on the most recent schedule; older schedules are kept as history.
Work schedule
Manage the employee's standard weekly working hours.
Valid from: 01/01/2025 - Valid until: —
Illustrative preview, recreated from the real interface — not a live screenshot.
Company-wide work-time settings
A few settings apply to the whole company rather than one employee. Find them under Account → Work-time settings.
- Working hours — general working-time settings for the license.
- Work breaks — define break windows (e.g. a 30-minute lunch break). These minutes are automatically subtracted from worked and planned time everywhere hours are totalled: employee tiles, the monthly overview, and the PDF export.
Work breaks
Illustrative preview, recreated from the real interface — not a live screenshot.
The override system
An override represents a planned change of status for one employee on a specific day — a public holiday, sick day, leave, or a manually adjusted working window. Overrides are managed from the employee's detail drawer, or directly from their monthly calendar page.
Override types
Every override has a type: Working, Off, Holiday, Sick, Leave, or Parental leave.
Creating a one-off override
- In the employee's detail drawer, find the
Create overridecard. - Choose a Type.
- Tick Full day, or leave it unticked and enter a Start time / End time for a partial-day override.
- Pick a start and end date — selecting a range creates one override per day in that range.
- Save.
Use the Overrides calendar date picker to review, Edit override, or Delete override for any existing day.
Recurring override rules
For a pattern that repeats every week, use the Recurring overrides card instead of creating one-off entries manually: pick a type, full-day or start/end time, the weekdays it applies to, and an Effective from date (with an optional end date, or leave it running until cancelled). Typical uses: parental leave every Thursday and Friday afternoon, or a permanent half-day on Wednesdays.
Set end date— close an open-ended recurring rule.Delete recurring override— remove the rule entirely (past overrides it already generated stay as history).
How overrides interact with the schedule
Create override
Schedule a temporary status change for this employee.
Type
Recurring overrides
For example parental leave every Thursday and Friday afternoon.
Parental leave — Thu, Fri
13:00 - 17:00 · Until cancelled
Illustrative preview, recreated from the real interface — not a live screenshot.
Correcting a check-in or check-out
An override changes a planned status; a work session is the actual clock-in/clock-out record. If an employee forgets to tap in or out, or a scan fails, you fix it with a correction.
What a correction is, and why everything goes through one
A recorded clock-in or clock-out is never edited or deleted — not by you, not by us, not by anyone. It is the evidence the registration duty is about, and it stays exactly as it was recorded. A correction sits on top of it: the original registration is kept and simply stops counting, and the correction says what the time should be, who decided that, and why.
That means three things in practice:
- A reason is required. Every correction asks for one, and it is what the corrections register prints.
- Your name is on it. Corrections you make are recorded as yours, exactly as an employee's own corrections are recorded as theirs.
- It can be undone. Withdrawing a correction restores whatever it replaced — including hours you removed.
From the employee drawer
The Work session card shows where the employee currently stands. Nobody badges from here, so the button records a correction rather than clocking them in: if they are clocked in, it corrects the open session (typically adding the check-out they forgot); if they are not, it adds a session at a time you choose, and you may leave the end time empty if they have not finished yet.
From the monthly calendar
Open the employee's monthly overview (View month overview) and click any day. The day lists what it holds, and each change opens its own dialog that states what will be recorded before it asks for a reason:
Add session— log a check-in/check-out pair that was missed entirely.Edit session— correct the times of an existing session.Delete session— take a session out of the count (a duplicate, or an accidental scan). The registrations behind it are kept, and withdrawing the correction brings the hours back.
Times that would overlap a session already recorded are refused, with an explanation — for you and for the employee alike. Two sessions covering the same minutes cannot be resolved into an honest total, so they are stopped before they are recorded rather than quietly reconciled afterwards.
The corrections register
Below the calendar, Corrections this month lists every correction touching that employee's month: the times, who entered it, the reason, whether it was accepted or withdrawn, and who reviewed it. Withdrawn entries are shown struck through rather than removed — a total that moved and then moved back is exactly what somebody auditing it needs to see. The same table appears on the monthly PDF.
Work session
Check-in time
08:57
Check-out time
17:04
Check-in time
08:52
Illustrative preview, recreated from the real interface — not a live screenshot.
Company holidays
Company-wide closure days — public holidays, a Christmas shutdown, a company trip — are managed once, centrally, instead of per employee.
- Go to
Account→ theHollidaystab. - Use the year selector to pick the year you're configuring.
- Click
Add new holliday, then fill in a From date, a To date, and a free-text Reason (e.g. "Christmas break" or "Public holiday — Armistice Day"). - Save. Use the row-level edit/delete icons to correct a mistake, or the trash icon to clear every holiday for the selected year.
Holiday override on every employee's calendar for the days it covers — you never need to add a holiday override per employee. If an employee already has a different override on that day (say, Sick or Leave), that entry is left alone and takes priority. New employees automatically receive the holidays already configured for the rest of the year.Hollidays
Christmas break
25/12/2026 — 26/12/2026
New Year's Day
01/01/2027 — 01/01/2027
Armistice Day
11/11/2026 — 11/11/2026
Illustrative preview, recreated from the real interface — not a live screenshot.
The dashboard (your home screen)
If time management is the only product on your license, logging in lands you on the dashboard: one month, everybody, in one place. It answers the question no other screen answers — how does the whole team's month stand, and what still has to be sorted out before it can be closed.
Use the arrows beside the month name to move between months. Everything on the page follows.
The summary cards
- Total worked — every hour the team recorded this month.
- Total planned and Difference — only on a full setup. On an hours-only license there are no schedules to plan against, so these are replaced by Days with hours: how many days anybody recorded anything on.
Per employee
One row per person, with their month's totals and a link into their own month overview. Past about a dozen employees a search box appears above the table and the table scrolls inside itself, so the two lists below it stay reachable.
Open corrections
Corrections nobody has ruled on yet. Deliberately not limited to the month you are looking at — something raised last month and never looked at is still waiting. Review opens the same accept/adjust/withdraw screen described under correcting a clock-in or clock-out.
Needs fixing
What is still wrong, as opposed to what has already been corrected:
- Open session — somebody clocked in on a day that has passed and never clocked out. Left alone this inflates their month, because an open session keeps counting.
- No hours — scheduled to work on a day that has passed, with nothing recorded. Full setups only: an hours-only license has no schedule to be absent from.
The employee overview
The Time management grid is your at-a-glance dashboard. Each tile shows:
- An IN / OUT badge — solid green if the employee is currently checked in.
- An orange "Absent" warning icon if the employee is scheduled to be working right now but has no open session — a quick way to spot who hasn't shown up.
- Today and Tomorrow rows with a colour-coded status (Working, Off, Holiday, Sick, Leave, Parental leave) and the scheduled time window when working.
- A footer line showing either "Checked in: {time} · {elapsed duration}", or the last recorded session if not currently checked in.
Click a tile to open the full employee drawer for that person.
Other tools on this page
The toolbar above the grid gives access to:
Read RFID card— hold a card to a reader and link it to an employee (see RFID badges).View logs— a paginated log of every registration (card UID, event type, timestamp). Corrections appear here too, marked as such, so the log is the full history of how a day came to say what it says.Corrections— the review screen, with a badge counting anything nobody has looked at yet.Manage kiosk devices— only shown if Kiosk is enabled on your license (see the Kiosk mode section above).
Account → Alert settings. It used to be on this page as well; one place is enough, and it is a setting rather than a daily action.Sofie Peeters
Checked in: 08:57 · 3h 12m
Tom Van Damme
Last session: 09:01 – 17:00
Amina El Idrissi
Checked in: 08:03 · 4h 06m
Karim Bensaid
No work session data
Illustrative preview, recreated from the real interface — not a live screenshot.
Monthly overview & PDF export
Click View month overview on any employee to open their monthly calendar — a day-by-day breakdown for a chosen month, with prev/next month arrows.
Exporting a PDF
- Open the employee's monthly overview and navigate to the month you need.
- Click
Export PDFin the top-right toolbar. - A file named {FirstName}-{LastName}-{YYYY}-{MM}.pdf downloads immediately — no server round-trip, so it works even if the data is only visible to you.
What's in the PDF
- A summary row: Total worked, Total planned, Difference, and Total breaks for the month.
- One table row per calendar day, with columns for Date, Scheduled hours, Override (type and window, if any), Sessions (all check-in/check-out pairs that day, or "Open" for a session still in progress), Break, and Worked minutes.
- A "Generated on {date/time}" footer.
Sofie Peeters — March 2026
Export PDF ⬇Total worked
148h 02m
Total planned
152h 00m
Difference
-3h 58m
Total breaks
11h 00m
| Date | Scheduled | Override | Sessions | Break | Worked |
|---|---|---|---|---|---|
| Mon 03/02 | 09:00-17:00 | - | 08:57-17:04 | 30m | 7h30 |
| Tue 03/03 | 09:00-17:00 | Sick | - | - | 0h00 |
| Wed 03/04 | 09:00-17:00 | - | 09:02-17:00 | 30m | 7h28 |
Generated on 03/05/2026 09:14
Illustrative preview, recreated from the real interface — not a live screenshot.
Frequently asked questions
Can an employee use both an RFID badge and the Kiosk PIN?
Yes — the two methods are independent. You can set up a badge, a PIN, both, or neither (in which case that employee can only be clocked in/out manually by an admin).
What happens if I forget to export a PDF before an employee leaves?
Nothing is lost — employee history is kept even after archiving. Open the archived employee's monthly overview and export as usual.
Does deleting a company holiday remove time already logged?
No. It only removes the automatically generated Holiday override for days no longer covered; any real work sessions or other overrides on those days are untouched.
Can two employees share one kiosk tablet?
Yes — that's the normal setup. Every active employee with a PIN appears as a tile on that tablet; there's no limit to how many can use the same device.
What if I don't have an RFID reader yet?
Start with the Kiosk PIN flow — no hardware required. You can add RFID badges for some or all employees later without losing any history.
Do you sell RFID readers?
No — Exalise doesn't manufacture or resell hardware. We integrate compatible network readers, such as the Inveo RFID-IND-U4, directly into your account; get in touch and we'll issue reader credentials and help with the install.
Do employees need to download an app from the App Store or Google Play?
No. The employee app is a web app that gets added to the phone's home screen from the browser. There is nothing to download from an app store, nothing to approve through device management, and no app for anyone to keep updated.
Can an employee use both a badge and the app?
Yes. The same person can badge in with RFID at the office one day and check in from the app at home the next. All methods write to the same timeline, so the monthly total and the PDF export are unaffected by which one was used on any given day.
How do we handle telework with this?
Employees on a telework day check in and out from the employee app on their own phone. The timestamp is recorded on our servers, not on the phone, and appears live on your dashboard exactly like a badge tap at the office.
Need a hand?
If something in the app doesn't match this documentation, or you'd like a feature explained further, we're happy to help.
Contact us